T-Shirt Forums banner

What's causing this problem? (lines in print, appearance of banding) (with pics)

1 reading
22K views 29 replies 11 participants last post by  Brian-R  
#1 ·
I've been struggling with our HM1 to try and reliably print an image for a while now. I'm using the colour-accurate ICC profiles from our distributor, and I'm printing with 1440x1440 for both whitebase and colour. Using Print Pro DTG Edition.

The print is on a black shirt, using the Wagner handheld to pretreat. Heatpressing for 10 seconds @ 340, spraying with pretreat, heatpressing for another 10 seconds @ 340, printing and then heatpressing to fix for 120 seconds @ 340.

Other colours come out fine - yellow: no problem, blue and black on other prints: no problem, and the whitebase is going fine as well.

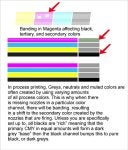
The problem (as you can see in the photos) seems to be many very small lines, which cluster together to give the appearance of banding when viewed from more of a distance. The spacing between the lines would indicate a print head-related problem? Although again, I'm not 100% sure if this is the root cause.


To try and get rid of it in the print, I've tried all sorts - increasing the colour boost to 20% then 25% (which does improve the print, but doesn't get rid of the problem completely), tried two passes of colour at 1440x720 after a 1440x1440 whitebase... I just can't get this right.


sample image (print at 1440x1440), no colour boost:
http://www.t-shirtforums.com/attachment.php?attachmentid=10926&stc=1&d=1253641344


First impressions for me are that it's either a problem with our red nozzles or encoder strip... And the latter would annoy me more, since I've been looking after the machine (after the last guy who used to do it left).

I meticulously clean the print head, capping station and (when needed) the encoder strip, and I've noticed that there is a miniscule line which looks like it's been grooved into the encoder strip by perhaps the head itself as it moves back and forward while printing. Could this be causing the lines in the print?


This is seriously holding me up from getting a good print out of this image, so any and all help/advice is appreciated! For the life of me, having tried everything I can think of, I'm still no nearer to actually fixing this problem (only a colour boost of 25% approaches covering up the problem). We've had no end of problems with this machine but the print head itself was fairly recently replaced...

Cheers!
Chris
 

Attachments

#3 ·
I would try changing your magenta damper first, and if that does not help, I would flush the machine with cleaning solution and distilled water. That may clear it up. If not then you will need to take further measures trying to clear buildup in your printhead, such as soaking with cleaning solution in your capping station, or flushing the printhead with a syringe. Have you tried printing the white at 1440 x 1440 and then the color, do a double pass at 720 x 720? Also are you using vivid darker on your setting of type of print?

Oh wait I just read you are using printpro and not rip pro, so the vivid darker might be called something else. There should be two different settings, one for photos, which on rip pro is photo normal, and then another setting for art/vectors which is called vivid darker on rip pro. I would think print pro has this same type of settings.

First though I would make sure you are having good ink flow. How does your nozzle check look?
 
#6 ·
Blimey, that's a lot of responses! Kudos to all who responded. :) I'll try and answer each in turn:

I don't think the magenta head's blocked, printing nozzle checks and ink bars gives four strong colours and equally strong whites. We had awful problems with our machine literally eating through print heads - turned out the capping station wasn't replaced after 18 months of ownership, even though we had loads of engineer time. Anyway, we're on a new(ish) print head and a new capping station, installed at literally the same time - all inks gave a 100% output at last engineer visit.


Re the nozzle check - that comes out fine. On the larger, full-page printout (with the blocks of colour and the groups of vertical lines) the colour blocks aren't 100% solid - but they're certainly good enough to ensure an excellent print, and I've had great results from just about every other image I've tried. I've printed out a variety of other images with no noticeable problems (including another image with hues of reds and yellows).

(What's winding me up with this particular trouble image is that we have to ensure that the colours are spot on with the reference pantones, or as near as can be - client is particularly demanding in this respect!)


We're using Print Pro v1.0 Build 1014 Release 3 (the help file doesn't match up for it though ;) - and we're using the colour corrected 1440x1440 ICC profiles, namely "Hi-res uni-d 2400 HM1 1440x1440 vc DP White and CMYK Ink Black Media.kcm". Colour and whitebase are both 1440x1440, and I made sure both were set to unidirectional with Variable2 dot size. When I installed the newer ICC profiles, I followed the instructions from our distributor to the letter and I had no problems installing them (the defaults that came with Print Pro were horribly off for colour accuracy!) As such, I've seen no settings for 'vivid' or 'darker'... Probably because there are none, given this is the colour-accurate profile? (again, correct me if I'm wrong)


I've not flushed the unit through with cleaning fluid because I'm not 100% sure how to do that without damaging it somehow. I've learnt how to use this machine by either watching others or by trial and error, so my knowledge of deconstructing it is a little scant. (I'm also petrified of damaging the dampers given how fragile their plastic sides are!) We've got all the stuff we need - syringes, cleaning fluid, swabs, lint free wipes for print head etc - and the capping station & print head are cleaned daily as well as at least one cleaning cycle and ink charge regardless of whether anything's printed.

Must go looking for some good flush through guides for this printer on TSF... Protips anyone?

We're using DTGTex DuPont inks direct from manufacturer. And doesn't our bank balance know it. (we've gone through more ink this year keeping the internals lubricated than we have actually printing T-Shirts, for various reasons... Poured another ÂŁ60 worth of white into the container, and another ÂŁ60 of waste ink into the drain, earlier this evening!)


I can happily supply photos of nozzle checks and/or full face prints if people want to analyse those. I think I can interpret the prints fairly accurately, but more expert insight is always appreciate. I'm currently digging around for some sheets of transparency paper so I can get a good look at the print quality (currently using the bare base raised full up to print the ink tests on, less than ideal!)
 
#7 ·
Its very easy to flush your system and you dont have to take anything apart :) You just fill your bottles with distilled water and cleaning solution. I usually use a 50/50 mix, and using the ink charge in your maintenance program start flushing with ink charges. Wait till the lines are flushing clear, and then fill the bottles again with distilled water alone and flush again for about 5 or 6 ink charges. Its really very simple :) You should add this measure as a once a month part of your maintenance to keep your dampers and head from getting buildup. I have done this since buying my HM1 over 2 years ago and am still only on my second print head :) It really helps a great deal.

Also what is your humidity level? Do you use a hygrometer to keep track of humidity? Its best to keep the machine above 40% humidity in your print room near the machine, and best above 50%. You will find that if your humidity drops below 40% you will start seeing banding on your prints. Hopefully this helps :) Let us know.
 
#9 ·
The print checks aren't 'perfect' - they're close but there's banding. The room where the printer is has a VERY dry atmosphere - it's in a small outdoor office which are converted stables, so the humidity level is very low.

I doubt the humidity level's above regular atmospheric humidity (possibly lower given all the electronic equipment we have in the office) - would buying a humidifier help? Our problem is we have MANY master tapes, decades of archive documents etc, all of which hate humidity, so we're in a bit of a pickle.


The machine's slated to go into a very large shed (18x12ft) but would this be even worse for it?


I have no doubt we're losing nozzles. I'm not looking forward to syringing all of our ink out and then flushing through with 50/50 solution/water... Is boiled water fine as a substitute for distilled water?

Its very easy to flush your system and you dont have to take anything apart :) You just fill your bottles with distilled water and cleaning solution. I usually use a 50/50 mix, and using the ink charge in your maintenance program start flushing with ink charges. Wait till the lines are flushing clear, and then fill the bottles again with distilled water alone and flush again for about 5 or 6 ink charges. Its really very simple :) You should add this measure as a once a month part of your maintenance to keep your dampers and head from getting buildup. I have done this since buying my HM1 over 2 years ago and am still only on my second print head :) It really helps a great deal.

Also what is your humidity level? Do you use a hygrometer to keep track of humidity? Its best to keep the machine above 40% humidity in your print room near the machine, and best above 50%. You will find that if your humidity drops below 40% you will start seeing banding on your prints. Hopefully this helps :) Let us know.


Some great advice from all contributors - thanks very much. So, to sum up:

What might be the best way to keep humidity at the appropriate level? (short of finding new premises ;))

What's the best way to flush both ways - take the top of the printing head off, remove the dampers (leaving them connected to the lines) and syringe from the end where it plugs into the print head? Bear in mind I have nil experience of taking the machine apart aside from the top cover and desparately prodding the ink lines with my finger :(
 
#8 ·
Christopher, the pics show that on the red(magenta and Yellow) that the magenta is missing some nozzles. If your nozzle checks are absolutly perfect, then something is happening as to the flow as the printer is printing. If you are in a dry environment the ink could be gelling on the face of the printhead causing the banding. Make sure the humidity is in the 35-40 range. If you are at a higher elevation make it higher. The other thing I'd check is wether you are getting proper flow into the head. without purging your whole system, you may just clean out the dampers as BobbyLee suggested. Flush both ways, let soak in cleaning fluid, then with distilled water. Clean the nipples into the head. If you have a lot of gunk blocking the screens in the dampers the head cannot get enough ink, thus causing starvation. Check the level on your magenta reservoir, any siphon action in the oposite direction could affect this also.

Ian
 
#10 ·
Get that hygrometer. These are not expensive. Your humidity is very important factor. I think this is job one for you right now. Boiling the water will not work for flushing lines. The idea is to not have any minerals that can calcify. You can probably download some videos from your vendor so you can become familiar with how to take things appart and better understand how the system works. Taking the dampers out is the only way to really flush both ways and soak them. It's also better not to mess with spraying any liquids around your electronics.

Ian
 
#14 ·
Never push fluid through a head, always pull. You may get a bit of dirt stuck in the nozzle.

You've piqued my curiosity. I'm a little puzzled as to how one might suck cleaning fluid through the print head... would it require full head disassembly or is there some tool which can be applied to suction cleaning fluid through?


Not been able to acquire distilled water so going to be using DI water instead in the 50/50 mix.

@ people who do this flush and clean routine often - for removing ink from bottles, do you just have one syringe per colour or is there some quick 'n simple method for excising every last bit of the previous colour from the syringe to go on to the next colour? I don't wish to cross-contaminate but it's laborious having to clean the one good syringe we have :rolleyes:
 
#12 ·
I would say your first thing you should do is get that hygrometer and a humidifier. Your machine will not lay ink right in a dry environment. That is probably the initial cause of your problem if it is low. Distilled water is best to use, but I have also heard of demineralized water as well, for flushing your machine. I would try doing a flush through the bottles first before taking anything apart on the machine.

I recall that outside of the US distilled water was hard to get, and that alot of people found the demineralized water instead.
 
#13 ·
This is a common problem as a result of using Print Pro, printing at 720dpi and the print head losing prime/charge when printing. I've had perfect nozzle checks and this has happened to me in the past. Sometimes it happens and other times its perfect, very random :(
 
#16 ·
Genius! Never thought of that. Just remove the dampers and attach syringe tube to 'pokey bits' where dampers are usually seated on top of heat? What about any potential problems from sucking through ink from the capping station pads along with the cleaning solution?
 
#18 ·
I'm having a similar issue, and have done many of the suggestions on here in order to try and rectify it.

During my last cleaning this afternoon, I decided to do a nozzle check. The check came out well, but very interestingly, in the magenta box, 3 of the line segments were yellow. Everything else was in the right place and color.

Has anyone seen this before? I can't help but think its related to the banding we're seeing on some reds.
 
#19 ·
@equipmentzone thanks, useful reminder. @vinyl signs was that what you were also referring to?


I'm having a similar issue, and have done many of the suggestions on here in order to try and rectify it.

During my last cleaning this afternoon, I decided to do a nozzle check. The check came out well, but very interestingly, in the magenta box, 3 of the line segments were yellow. Everything else was in the right place and color.

Has anyone seen this before? I can't help but think its related to the banding we're seeing on some reds.

I did a similar print check earlier, and VERY interesting in one of the tests about 2/3 down the page, there were blocks of cyan in the black... And the rest was fine. Veeeery strange. (took pics, will post later probably)
 
#22 ·
Just one? I can't see an obviously detachable single cable leading out of the capping station - however there is a white and a colour waste line, both of which are unpluggable (as I found out the other day when the white waste line detached itself! That was fun to clear up.


I should take some photos of the internals now the case is off... Now I have to get this cleaning juuust right and make sure I don't damage any of these dampers :/ Any final tips before I start pulling the ink out of the lines and taking the head apart to remove the dampers?
 
#21 ·
christopherw;568917 I did a similar print check earlier said:
cyan[/B] in the black... And the rest was fine. Veeeery strange. (took pics, will post later probably)

This file explains what happens with process printing.

Ian
 

Attachments

#24 ·
Cheers for that :) Understand how process printing works, (didn't realise that the machine will always rich black + K unless it's specifically configged not to), but the test where I was getting introduction of colour was on what appeared to be a single colour test. If so, something very odd was going on with it! (I took photos, still on camera though).


Must copy them all off the SD card and upload...
 
#23 ·
Well, yesterday I did a complete flush through of CMYK + white lines plus I carefully flushed through the dampers, all appear to be in working order. Capping station is functioning just fine. So if, we have any problems with prints after ink is charged back through it *must* be the print head. Will be very disappointed if so, because we've only had this print head for a month or so.
 
#25 ·
We ran a full a flush of the CMYK, and afterwords finally achieved perfect nozzle checks with no discoloration or signs of banding.

However, on our first print we did notice some very small banding. Compared to before, its hardly noticeable, but to my critical eye, its still an issue.

Our humidity is at an acceptable level, and we're still getting good nozzle checks. Do you think its an issue with the Dampers? If so, whats the process for replacing them. I've got some spares, but can't find a video showing me how to do it on my HM1-C
 
#26 · (Edited)
It's annoying isn't it... what more do we have to do to achieve no banding in prints?! It's almost like these machines need to be in a hermetically sealed environment when not printing in order to keep them at a true 100% performance.

I've not tried the machine yet as I've not charged ink through it - needs to sit for 12 hours until more cleaning solution arrives, then I can do final flush of all tubes to remove any sediment and then run ink through again. Should be interesting to see if what I've done was worth it (was in from 5pm until midnight on Saturday!)


The HM1-C is almost identical to the original HM1, right? If so, it's not too tough to take out the dampers.

Unscrew the metal top, first removing the plate underneath which covers the dampers (our HM1 has a two-stage top cover). You should end up with five screws; one either side which hold the lower plate to the plastic, and three which secure the top part of the cover (where the tubes finally loop underneath before going into the dampers, and the plastic 'caterpillar track' connects).

Once you're there, you can rotate the top plate 90 degrees to make it easier to see the dampers in their holder. You can just grab either side of the plastic holder, and gently pull up - all 8 dampers come away from their seating on the top of the print head.

Putting all eight back is a little tricker... ;) Be careful that the ink tubes don't get bunched together and push the metal plate up - you might find the top of the print head rubs or catches on the metal frame for the excess 'caterpillar track' when it goes from left to right during printing and print head cleaning. The best way to check is, when putting everything back together, is to gently tension all the screws then move the print head from side to side by hand to make sure it won't catch when it goes along the bar during a print. Your clearance should be fine as long as you were careful. :)

I found it way easier if I had a pencil torch / mini Maglite to illuminate the dark space inside the top of the print head, particularly to help lining up the ink head input nozzles with the damper outlets.

... I am making it sound tougher than it actually is :D (with gentle positioning you can do it by feel - but make sure you don't squeeze the sides of those dampers and break the plastic!)
 
#28 ·
Ah, I'm glad someone else has also suggested this! I did notice - just a couple of times - that sometimes a print wasn't quite as bad if I left it then went straight to a new print. Is it purely the buildup of ink in the head helping that? (one would think that when the printer does a quick head clean or ink dump, it would help to keep the internal ink pressure high). Or, is it just a quirk of the print head causing that?


I've flushed the machine right through; cleaned and flushed all ink lines, cleaned and flushed dampers, cleaned and flushed print head, cleaned and flushed waste ink, cleaned and flushed capping station! I've done some prints on white and they come out fine (but they always did) - next test is the same image on a black shirt, which I'm going to have to do sometime this week or next. I'll update with results when I print them. :rolleyes: