T-Shirt Forums banner

D.I.Y Line Table and Screen Stretcher

130K views 251 replies 53 participants last post by  Antonio Love  
#1 · (Edited)
Good Evening

Been awhile since I posted been busy started getting some clients and launched a label, but this is about my baby I built yesterday :)

10 platen portable line table, I built it on a existing table with out damaging the table :) need to print 100 2 colour long sleeves on Thursday so decided to go from 2 platen to 10.

3 point registration cheap to make, I am making a screen holder/dryer for multi colour jobs and drying screens built it on a old tv trolly so it is mobile :)

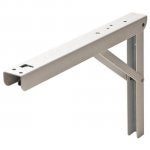
The first image is 2 pieces of wood that keep the whole press firmly on the table without damaging the table unscrew the butterfly bolts and the press is unattached from the table
 

Attachments

#3 ·
First test run on new press

2 colour water based on 180g fitted t's, the white ink was cold and I gambled printing only 2 shirts but registration was good.

it is 11pm here so sorry for flash on images will be printing a extremely tight registration test tommorow in the day so will post better images, but I am really happy with it
 

Attachments

#6 ·
Very nice. If I ever were going to build a press, it would be a line press. Building a rotary as a DIY seems like more trouble than it's worth, and these line presses seem to get the job done!
 
#7 ·
Decal Designs line press is the easiest and cheapest to build and with a bit of practice it is super easy and fast, plus the fact that you can print unlimited colours and set up as many platens as needed makes it a winner.

The first few times I was really nervous but it registers every time and is very fast, only issue I had was printing water based the ink was drying pretty fast but once I added a lot more ink to the screens and flooded properly it went smoothly.

large runs it is a 2 man operation print - flash to avoid ink transfer then print next colour etc., on single colours it is easy to do large runs with one person.

I had to change from a pull stroke to a push stroke but it feels right now.

push to print and pull to flood, if you need any answers or more photos let me know and I will gladly post
 
#9 ·
The platens are larger so that my frame makes more contact and sits more firmly this also allows me to make larger prints with ease.

other image is of the center reg "stopper" it is centered on the platen with the frames centered on the stopper
 

Attachments

#11 · (Edited)
Will do hold on :)

i use metal large frames and smaller wooden self stretched ones

the bottom photos show i glued a small wooden block on one side of each platen to stabilize them so there is no lateral movement on the platens.

The drying rack was made from leftover wood from the press and mounted on a old tv trolly for the wheels.

and then the 3 point registration is a t-bar and 2 nuts the nuts square the frame and the t-bar finds center and registration is done on the platens.

Hope this helps
 

Attachments

#12 ·
Please provide me with some more specifics on the materials used.
I'm assuming you are pushing the ink towards the back so the screen doesn't move? I've seen printers using one hand to hold the screen in place. I use very large screens and that is not possible. That is why I need something that I can use both hands on squeegee and screen stay registered. Any help would be appreciated. Thanks!
 
#13 ·
Hi Jody

I pull stroke to flood and push stroke to print the push stroke then also helps stabilize the frame but you can also use your hip or but the registration bar at the bottom if you need to pull stroke.

I use 22 x 24inch metal screens and also need to use both hands and the push stroke takes care of that problem.

As for material it is 2x2 and 2x4 wood lengths that I cut to size, and pressboard for the platens.

Once you figure out how many platens you are going to use then you build accordingly it really is simple, if you can work with metal to build it oit of angle iron would be first prize but since mine is portable I built it out of wood.

You can even make a single platen line press I have 2 single platens set up for kiddies shirts I just bolted them to a worktable.

It really is very simple and as long as your center registration stop and registration bar on the screens are all the same you will have no issue with registration.

attached is my platen for small kiddies shirts, the 3 blocks of wood work as the stoppers for registration, since the frames are larger I needed to put the wood there so that the stabilising bolts on the frame makes contact to square it and the center piece is the stopper for the registration bar ( t-square) on the frame.
 

Attachments

#14 ·
thank you, it looks good!

It holds registration because you are pushing screen towards the registration bar. How about when you flood the screen? Are you just holding the screen up and using 1 hand?

What size did you make the platens?
I was thinking of screwing it from the bottom so the screws don't interfere with the print design. I guess that was not a problem for you?
There is one 2x2 under the platen so you have room to put shirt underneath? And you show 1 wooden block on one side of the platen "to stabilize it".. Not sure how that works.
I'm also thinking of making the platen so I can easily change the platen size.
 
#15 ·
thank you, it looks good!

It holds registration because you are pushing screen towards the registration bar.

The 2 bolts on the screen square the frame so it does not move (sideways) then the push stroke keeps it squared.


How about when you flood the screen? Are you just holding the screen up and using 1 hand?

Yes i lift the front of the screen up off the shirt and then one hand flood

What size did you make the platens?

My platens are slightly smaller than my frames but the frames still rest on the top and bottom of the platen to help with stability, working with water based i dont use off contact.


I was thinking of screwing it from the bottom so the screws don't interfere with the print design. I guess that was not a problem for you?

I screw them in from the top then filled in the indentation with sawdust and wood glue the "holes" are at the registration ( bottom end) so never cause a problem.

There is one 2x2 under the platen so you have room to put shirt underneath?

Yes I can pull a small - xxxl size shirt on to the platens with no problemsthere is plwenty space to pull a shirt on

And you show 1 wooden block on one side of the platen "to stabilize it".. Not sure how that works.

Without the "stabilizer" the platen has a lot of sideways movement, since it is only held down by the piece of wood at the bottom, that piece of wood prevents any sideways movement of the platen and makes it sturdy, if you build a line table you will see what i mean, since you need space to pull the shirt on to the platen.


I'm also thinking of making the platen so I can easily change the platen size.

Line Table is so flexible you can so that no problem, or even make 2 for small and 4 for large etc, mix and match
I am printing tomorrow and will take some photos of the whole process hopefully that will help
 
#16 ·
ok did 3 quick prints to show the flood and print strokes also for jodyl2 to show that I also use large screens, wife was the photographer so blame her for dodgy shots :)

1. First image shows me getting ready to flood screen I lifted the screen higher than usual but that is to show the principal behind the flooding

2. Busy with my flooding

3. Push Stroke to print (see ma both hands) :p

4. Print

5. 3 prints done if I was not being photographed it would take under 2 minutes to do all 3 prints.

I am by no means a expert but this is what i have found to work for me, so there is still lots to learn but with this set up I can do volume multi-colour prints and also small runs, with minimal outlay costs.

I would like to make a metal frame and angled platens one day and buy a tunnel dryer , but I cannot justify the costs right now.

the piece of long wood sticking out in photos 1 and 5 is for beanies and small baby onesies, I have a small frame for those prints and use a mini squeegie
 

Attachments

#23 ·
if you have problems with transparencies shrinking, if you got some good transparencies, you can try to reclaim and reuse it. I have not tried this myself as when I tried to reclaim rthem about 2 years ago the transparencies simply got translucent.

However, others have reclaimed transparencies successfully. The transparencies reclaimed are transparent. Then, they add 50% white glue to 50% water plus a few drops of screen printing pigment to give it color. Then this 50-50 solution is printed on to the transparencies and air dried. That's it.
 
#24 ·
Interesting but seems like a lot of work :), the transparencies are cheap enough, and it only happens every now and then, I think I should send them through the printer first and then print try and "preshrink" them.

Was to busy with designing to print today, but did expose the union jack screens and mixed up the custom grey ink, so hopefully I can print tomorrow.
 
#29 ·
registration is done on the platen, and since each platen and screen set up is identical the only chance of misprinting is human error usually by not lining the screen up properly on the center registration bar.

there really should never be a issue with sideways movement so if you doing say 4 colour print

you would register each transparency to each other on the platen then place your screen and "grab" the transparency to burn

I print the design on paper stick that down on the desired position on the platen and then register each colour on that, using double sided tape on each transparency.

when i center the screen over the transparency and push it down it sticks in place and is ready to burn

hope that makes sense
 
#31 ·
That in a nutshell is the pre-exposure registration I am talking about. If you constantly have problems with your registration then there is a problem with your registration system. Something you did is not right.

Make sure that your registration rail is straight across all platens. Make sure that you registration screws, guide or whatever it is called are on the same position across all frames. If they are 16 inches apart, say one 1 8 inch to the left and the other 8 inches to the right of the center guide, make sure that it is so in all the frames.
 
#33 ·
I am doing a bunch of 2 colour prints next week, with some tight registration for my store, I will take photos from getting the film registered on the screens and hopefully that will make it easier to understand but as Brojames said if you get your setup correct you should never have to try micro register and you only have to worry about ensuring that your screen is square and centered on the platen.
 
#35 ·
awesome stuff, but did i miss the part about the screen stretcher?

already have a press so came here looking for a way to do the remeshing myself. i'm spending way too much money on shipping to and from and the actual cost of stretching silk screen.
 
#39 ·
I did 100 2 colour prints on my own in under 4 hours that is getting shirts on the platens print - flash - print and taken off the platen.

I did slow down after around 60 but that is because i use large metal screens and the prints where full front.

Practise will up the speed but if you think most starter rotaries are single station machines it is way quicker to print 10 at a time, and if you have the space no limit to how many platens you can layout.

my setup is portable and I need to reclaim that table soon - so I want to layout 10 platens next to each other and use one wall less walking around the table, by using these brackets, since once done fold them down
 

Attachments